Configuring Benchmarks for feedback reports
Configuring Real-time, Manually-defined, or Historical Benchmark scores for feedback reports
Note: this section applies to the Professional and Enterprise Editions of EchoSpan
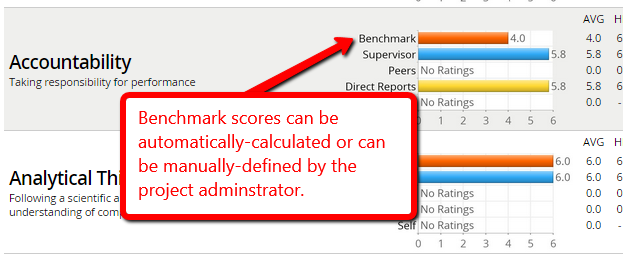
What are Benchmark Scores?
Benchmarks are comparative scores that are presented in conjunction with a Target's own feedback scores for use in determining proficiency or gaps in performance compared to peers. The EchoSpan 360-Degree Feedback tool offers three ways to generate benchmark scores for presentation in feedback reports:
- Real- time: benchmarks can be created automatically by averaging all Rater responses within a project, segmented by item or competency
- Manually- defined: benchmarks can be defined by the administrator for a project. Manually-defined benchmarks are usually computed using historical data or are expected proficiency measures set by a company.
- Historical: benchmarks can be calculated from scores in past projects
Configuring Real- time Benchmarks
Setting up your feedback project to include automatically-created benchmarks is easy. Benchmark scores are, by default, generated every time a report is run. The only thing you, as the administrator, need to do is to make sure that your report template includes components with benchmark scores turned on.
To activate the display of benchmarks in your feedback reports:
- Create a feedback report template using editable components. For help on
how to do this, please see the article on creating
editable report templates.
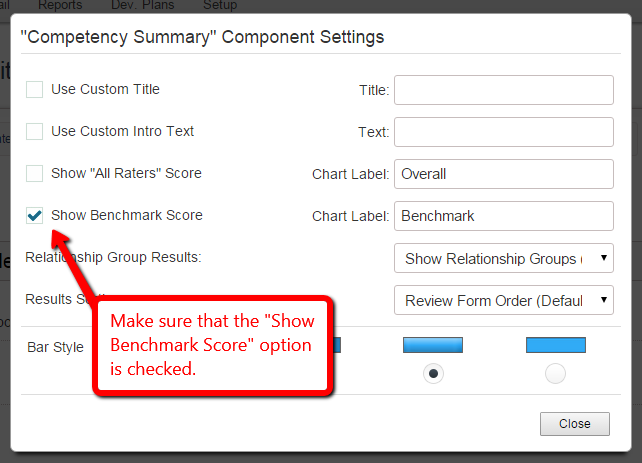
- Click the "Settings" link next to the name of the report component you
want to have display benchmark scores.
- If benchmark scores are available for the selected component, an option
titled "Show Benchmark Scores" will be visible with a checkbox next to it.
Check the checkbox to activate the display of benchmark scores. Optionally,
you can also change the label that is shown in the reports by altering the
"Chart Label" value. The next time you run a report with this template,
benchmark scores will be visible.
Configuring Manually-defined Benchmarks
Note: this section applies to the Professional and Enterprise Editions of EchoSpanCreating Manually- defined benchmarks for your project requires a few additional steps, but is helpful in situations where you want control over what benchmark values are displayed in the report. Benchmarks can be created for individual projects. With the Enterprise edition of the tool, you can even have multiple "benchmark profiles" in each project (explained below).
To configure Manually- defined benchmarks:
- Finalize your project's review content first. Make sure your items and
competencies are not likely to change.
- Navigate to the Reports >> Custom Benchmarks menu option in your
project.
- At the top of the page, click the "Manually- defined" benchmarks radio button to
activate Manually-defined Benchmark Scores.

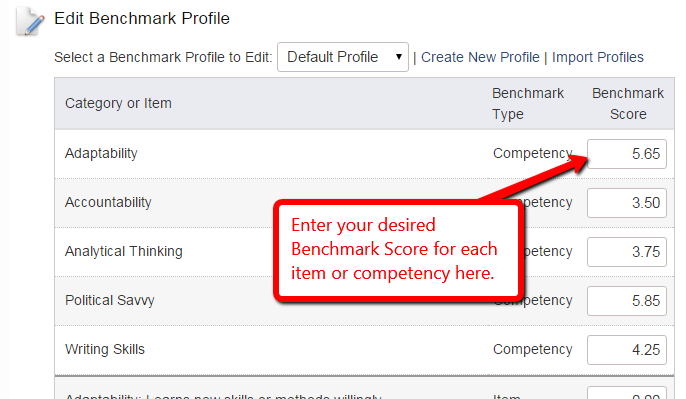
- Next, enter your desired Benchmark Scores. You'll see a list of all of
your project's competencies and items along with a Benchmark Score text
field to the right of each of them. The first time this page loads, all of
the Benchmark Score fields will have the value "0.0" in them. Just replace this value
with your desired item or competency benchmark score. The fields save your
entry automatically, so there's no need for a "save" button. If you do not
wish for a particular item or competency to display a Benchmark Score, just
leave the default 0.0 value and it will be omitted from reporting. Benchmark
Scores have a standard precision of one decimal place.
- Activate the display of your benchmarks in your reports by following steps 1-3 of the "Configuring Automatic Benchmarks" section above.
To configure Historical benchmarks:
This feature applies to the Enterprise Edition of EchoSpan only.
- Navigate to the Reports >> Custom Benchmarks menu option in your project.
- At the top of the page, click the "Historical" benchmarks radio button to activate Historical Benchmark Scores.
- You will see there are two choices of benchmarks: 1) Overall, competency and item; and 2) Overall and competency only. When you click which type of benchmark calculation you want, the system goes to work and produces a list of projects that are “compatible†with that type of calculation. In other words, if you select choice #1, all items and competencies must have the exact same wording throughout the review.
- Check the projects you want to include in the calculation. Note that you have to explicitly select the project you are working in if you want to include the benchmark for that project in the score. Also note that password protected projects are always excluded from this list and cannot be used in historical benchmark creation.
- After checking the projects you want to include, select the weighting method you want to use. There are two to pick from, unweighted and weighted.
- Unweighted. With this option, the system will average all benchmarks from included projects evenly. So for example, if the benchmark scores it gathers from 3 projects in the "Communication" competency are 5.5, 4.8 and 5.6 then the calculated benchmark for all 3 together is their average (5.5 + 4.8 + 5.6) / 3 =
5.3
- Weighted. This means that the benchmarks taken from each project are weighted based on the number of targets in each project. This gives projects with more targets more "say" in how combined benchmarks are calculated. Taking the example above, if the number of targets in each of those example projects was 100, 50 and 12 respectively, then the weighted average benchmark score would be calculated as follows:
Total number of targets across all projects: 100 + 50 + 12 = 162
Get percentage of total targets each project holds:
Project A: 100 / 162 = 61.7%
Proect B: 50 / 162 = 30.8%
Project C: 12 / 162 = 7.4%Then, the "Communication" competency benchmark scores for each project is weighted and summed to arrive at the final calculated benchmark for the competency:
(5.5 x .617) + (4.8 x .308) + (5.6 x .074) = 5.27
- Select the benchmark profile you want to deposit the resulting scores into.
- Then, click the "Calculate" button. Benchmarks are computed in real-time.

Advanced Usage: Creating Additional Benchmark Profiles
This feature applies to the Enterprise Edition of EchoSpan only.
There may be instances when you want to have multiple benchmark sets in a particular project. For example, a project may contain Targets in multiple levels or roles in your organization (i.e., Executives, Associates, Managers), and you want to present distinct benchmarks in their reports based on their peer group. In these cases, a single benchmark set will not work, as benchmarks would be the same for everyone. The solution is to create distinct Benchmark Profiles within your project, and then assign Targets to profiles as appropriate.
- From the Configure Custom Benchmarks page, click the "Create New
Profile" link.
- In the pop-up window that appears, enter the name of your new Benchmark
Profile and click the "Submit" button.
- The page will refresh with your new Benchmark Profile active. Enter the desired Benchmark Scores for the profile.
Advanced Usage: Importing Benchmark Profiles
Rather than creating Benchmark Profiles from scratch for every project, you can import Benchmark Profiles from other projects with just a couple of clicks.
To import Benchmark Profiles from an existing project:
- From the Configure Custom Benchmarks page, click the "Import Profiles"
link.
- In the pop-up window that appears, select the project containing the
Benchmark Profiles you want to import and click the "Import" button. Once
you import benchmarks, you can edit them in this project without affecting
the source project's benchmarks. Note that importing profiles will overwrite
all profiles existing in the project. Additionally, the content (items and
competencies) of the source project must match the current project's content
exactly in order to import benchmarks.
- The page will refresh with your newly imported Benchmark Profiles active. Enter the desired Benchmark Scores for the profile.
Advanced Usage: Associating Targets with a Benchmark Profile
This feature applies to the Enterprise Edition of EchoSpan only.
Unless otherwise assigned, all Targets are associated with the "Default Profile" Benchmark Profile. You can designate which Benchmark Profile to which a Target or group of Targets should be associated either at the time Targets are uploaded, or after they have been entered into the system.
To upload new Targets and associate them to a particular Benchmark Profile, follow these steps:
- In the administrative tool, Select Targets >> Import From Excel from the
main navigation menu.
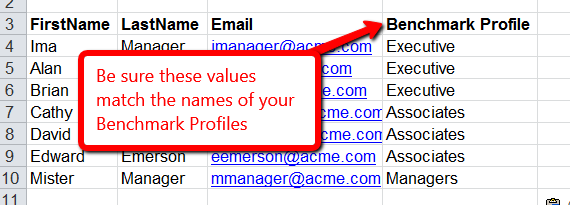
- Paste your upload template into the text box. Be sure that your upload
data contains a column for Benchmark Profile, and that the values in the
rows for this column match the names of your Benchmark Profiles exactly.
- Click the "Next" button and assign your Benchmark Profile values to the
correct upload column using the drop-down selectors.
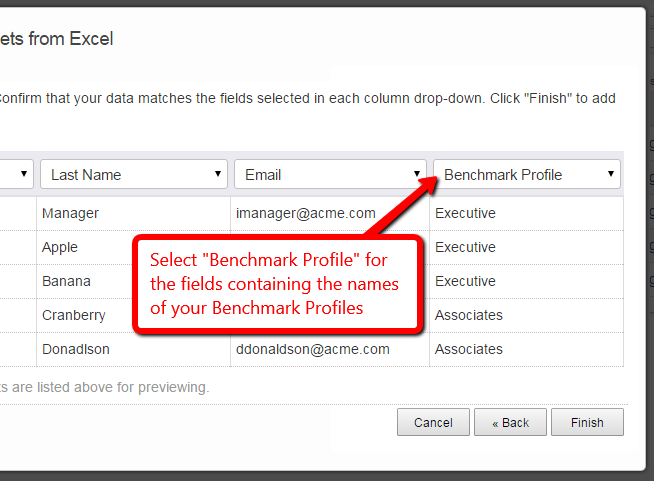
- Click the "Finish" button to complete your upload. When reports are run, Targets will be shown the appropriate Benchmark Scores based on their assigned Benchmark Profile.
To create a single Target with a Benchmark Profile association:
- From the Project Dashboard, enter the new Target's details in the "Add a
New Target" panel at the bottom right of the screen.
- Click the "Additional fields..." link.
- Enter the name of the Benchmark Profile you want to associate the Target with and click the "Submit" button.
To assign an existing Target to a Benchmark Profile:
- From the Project Dashboard, click the name of the Target you want to
modify.
- On the Target profile page that follows, click the "Edit Target's
Details" link at the right of the page.
- In the Edit Target pop-up window, enter or change the value in the
Benchmark Profile field. Be sure that the value you enter matches a name of
one of your Benchmark Profiles exactly.
- Click the "Save Changes" button. When reports are run, Targets will be shown the appropriate Benchmark Scores based on their assigned Benchmark Profile.